A Million Little Pieces
I've Been Framed
Guts and Glory
Pins and Needle Files
My Luggy Day
Searious Issues
Sliding Into Position
All Together Now
Spacing Out
Wear to Go from Here
Barreling Ahead
Breech of the Piece
Starting Out with a Bang
Round Two (hundred)
The Kart of Barrel Fitting
Fed Up
Safety is a Snap
Dispatches from the Front
Pulling Through
The Final Part
Lessons Learned
Frequently Asked Questions
Errata and Clarifications
More articles
Pulling Through
In addition to feeding and extraction issues, there was the minor issue of the trigger, which was a heavy, gritty, stagy atrocity. I wasn't suprised that it was bad; that's to be expected when tossing random fire control parts into the gun without any fitting. What was surprising was just how bad it was. I couldn't even get an accurate assessment of the gun's accuracy due to the excessively heavy trigger.
But exactly how awful was it, anyway? I resolved to find out, but since I didn't have a trigger scale, I was forced to improvise:
Precision trigger pull scale.
I tied down the grip safety and attached an empty milk jug to the trigger. The plan was to pour in water until the trigger tripped, then measure the volume: A pint's a pound, the world round. Alternately, a milliliter's a gram, but I don't give a damn; this is America.
While spitting out cunning aphorisms, it should be noted that in theory, theory and practice are the same; in practice, they are not. In other words, the milk jug trigger scale didn't work well at all. I got very inconsistent readings and water all over my shoes. My backup plan involved getting Lazarus to test the trigger with his digital trigger pull scale, a minor increase in technology over my method. Thus tested, the trigger was shown to have a delightful 10.25 pound pull.
I'm no trigger prima donna, but ten and a quarter pounds is a bit excessive. Fortunately, help was at hand: In addition to having a trigger pull gauge, Lazarus also had good working knowledge of how to do fit a hammer and sear, and was willing to walk me through the procedure. Although my first run through used his tools, I was so excited at the demystification of the process that I went out and bought my own set of equipment.

Just a few simple tools.
The easiest tools to acquire were the glasses, both magnifying and piece of. The magnifying glass is useful for examining hammer/sear interaction (more on that later); the piece of plate glass makes a nice smooth surface for knocking down high spots on the sides of flat parts like the sear and hammer.
Most of the abrasive heavy lifting is done by the stones, though. From bottom to top, these are medium, fine, and extra-fine stones.

Bottom to top: dirty, filthy, and extra-filthy.
The idea is to use these in sequence on the sear angles. The medium stone shapes the metal, the fine stone refines the shape and knocks down high points, and the extra-fine smooths the surface. Of course, the ability of these stones to apply precise angles to hardened steel would be entirely theoretical if they couldn't be controlled or supported in some way. That's where the sear jig comes in:

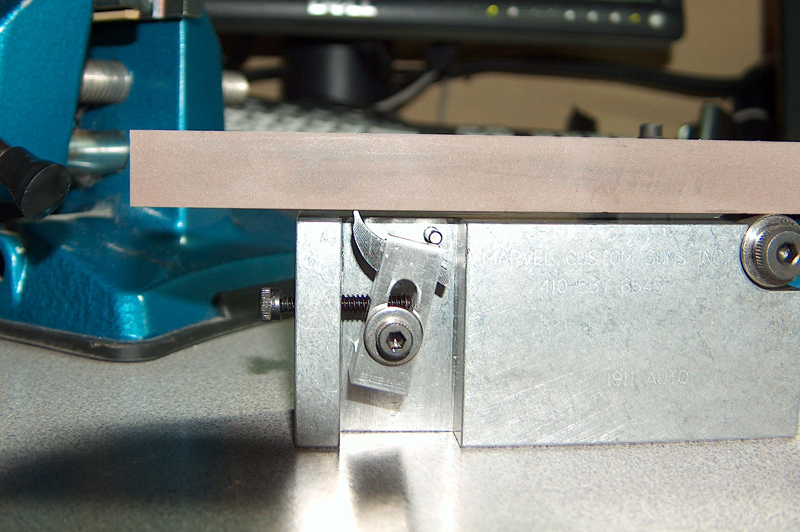
The jig is up!
This is the Marvel sear jig I bought from Brownells. The entire point of a sear jig is to hold the sear at a precise angle so that the engagement surface can be stoned at an equally precise angle. Precision is the name of the game here, as the mating surfaces of the sear and hammer interact at angles and sizes smaller than the human eye can detect. In fact, some pistolsmiths who do trigger jobs for bullseye shooters use microscopes to examine the engagement between the hammer and sear.
My methods were slightly less precise:

An engaging spectacle.
Spectacles are what you need to get a good look at the tiny slivers of metal responsible for holding the hammer in place. I tried taking a photo of the view through a magnifying glass lens, but attempts to do so only succeeded in driving my camera's autofocus feature insane.
The pins on which the hammer and sear sit are special pins that fit through the standard hammer and sear pin holes, but feature flat bushings and extended shafts so that the interaction of hammer and sear can be seen exactly as it will occur inside the frame. The downside to frame pins is that viewing the opposite side of the hammer and sear requires removing everything and setting it up in reverse on the other side of the frame. You can get pin blocks, which are small slabs of steel with pins inserted in at the distances specified by 1911 blueprints. Cutouts in the slab make looking at both sides of the engagement as simple as turning the block over. The downside to pin blocks is that the location of the pins in this block doesn't necessarily say anything about the pins in one's frame. The best compromise are pin block with adjustable pins to permit fitting to the eccentricities of a given frame, but those can get pretty pricey. Since I was only interested in a carry-grade trigger of moderate to heavy weight, the frame pins would work fine.
(Note: I define "carry-grade" and "moderate to heavy weight" to mean a trigger in the five to six pound neighborhood. Like I said, I'm not a trigger prima donna and strongly question the wisdom of putting a sub-four-pound trigger on a 1911 for reasons of durability and safety; compromising the latter is the inevitable result of compromising the former in pursuit of a trigger pull better suited to a revolver than a semi-auto. But that's a rant for another day when I have some unassailable diagrams.)
The primary concern.
Setting up the sear in the jig is actually pretty simple, consisting of putting the sear in place, rotating it clockwise until the lower legs are stopped by the screw on the left, then locking it in place. The left-hand screw defines the steepness of the primary sear angle, which must be set before locking things up.
True grit.
Once the sear is positioned correctly, the stones are used to first shape, then smooth the metal surface. Although the jig is mostly a giant block of aluminum, the roller is steel to ensure it isn't chewed to bits by the stones as they roll over it. Force must be applied evenly and consistently; I ruined a sear by not placing consistent force on the entire stone, causing one side to be eaten away prematurely. Reshaping the primary angle requires frequent checks for evenness and the progression of the reshaping. As the new surface takes form, the line of filed metal will move toward the base of the sear nose; when it hits that base, it's time to stop filing. (Removal of too much material from the sear impairs its ability to catch the hammer hooks.) This means that you don't get many, if any, do-overs. Personally, this didn't make me nervous at all.
Nope, not even a little.
Secondary importance.
The secondary sear angle is determined only by the shape of the sear itself when using this jig: Unclamping the sear lets it rotate back until it's stopped by a fixed bar. This isn't a big deal because the secondary angle isn't as important as the primary; its job is just to help the sear get out of the way of the hammer.
Smooth operation.
The fitting itself is a finicky and tedious operation of setting and smoothing angles, comparing with the hammer hooks, assembling, testing the pull, and repeating until the trigger is to one's satisfaction. There's also the optional step of going too far, creating a trigger that trips when an extra-heavy neutrino runs into it, and starting all over again. It's like setting the seating and crimp on a reloading press, except there's no bullet puller to fix things if you go to far.
The final result was a trigger pull that, the more I thought about it, felt far too light. I was somewhat irritated by having overdone things again, and even went so far as to order another sear to replace the one I had clearly screwed up. If I had to guess, I would have said the trigger was in the low four pound range, maybe even high threes.
Then I measured the pull on a trigger gauge: 6.5 pounds. It just goes to show that either I have no idea what triggers weigh, or that smoothness and crispness contribute more to a light-feeling trigger pull than the actual gross weight.
As you've probably already noticed, this chapter doesn't contain much in-depth analysis of trigger jobs. (I don't even touch on hammer prep.) This is for two reasons: First, this is an account, not a guide, and second, the theory and application of 1911 triggers is a huge subject, big enough for an article all its own. I was going to go in-depth into sear face angle, hammer hook depth, positive and negative engagement, and all the fun, mind-numbing details guaranteed to cure insomnia. I even started drafting some diagrams, but then a realization hit me: This account is huge, much larger than I ever anticipated making it. (Of course, there was more involved in this build than I ever expected.) Did I really need to make it much longer?
As evidenced by the lack of further information on 1911 triggers, the answer is no. I'll do a more extensive writeup on 1911 triggers sometime in the future, so check my articles index for the appearance of said writeup if the subject interests you.
The trigger pull problem had now joined the feeding and extraction problems in the annals of solved issues. With no further parts to add or problems to solve, was this the end?
email: hidi.projects at gmail.com