A Million Little Pieces
I've Been Framed
Guts and Glory
Pins and Needle Files
My Luggy Day
Searious Issues
Sliding Into Position
All Together Now
Spacing Out
Wear to Go from Here
Barreling Ahead
Breech of the Piece
Starting Out with a Bang
Round Two (hundred)
The Kart of Barrel Fitting
Fed Up
Safety is a Snap
Dispatches from the Front
Pulling Through
The Final Part
Lessons Learned
Frequently Asked Questions
Errata and Clarifications
More articles
The Final Part
The final part installed in the 1911 had been the extended ejecter. The final part of this writeup is showing you pictures of the completed firearm.
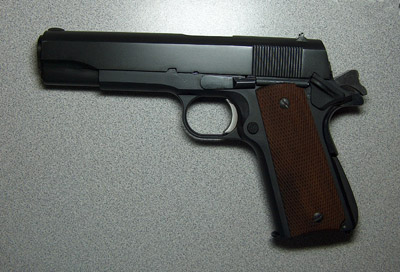
The blank slide lends the gun a smooth, monolithic look.
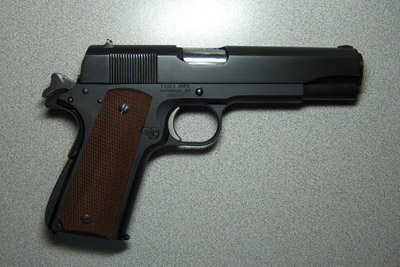
The barrel hood and sides of the hammer were left in the white to match the aluminum trigger.
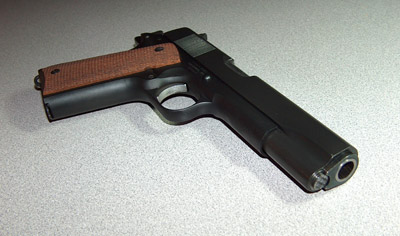
Note the Kart oversized bushing.
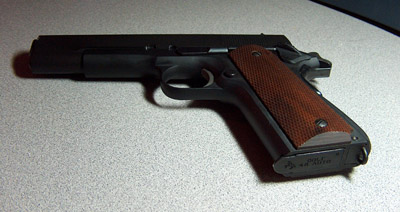
A low angle shot shows the Colt hybrid mag.
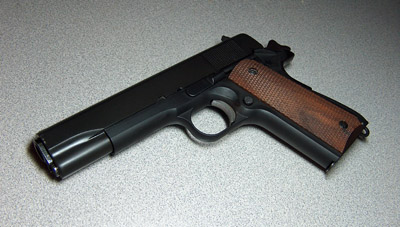
My favorite shot.
I placed an order for a Sarco parts kit and Essex frame on July 17, 2006. Today is July 22, 2007, and I just returned from performing final testing on the 1911. This project has taken almost exactly a year of work. To be fair, there were long stretches of down time while I waited on parts or tools, and weeks where I didn't even touch the thing. I worked slowly and tentatively and set things aside when I started feeling frustrated.
There are a few things to tweak (an oversized firing pin stop, maybe a new extractor, taking the barrel ramp in a bit to compensate for the recut frame ramp, etc.), but then there will always be things to fix, enhance, redo, or replace. The trick is knowing when to call things complete, and now is as good a time as any. Feeding is reliable, extraction is reliable, if erratic, and the trigger is good. The final product is not worth the money invested, but when combined to the time, experience, and learning, it's worth every penny and then some.
The experience itself has been enlightening, infuriating, and enjoyable in roughly equal measures. As a kid I enjoyed building plastic models, and this project brought back the fun of watching something take shape and working with one's hands that I'd all but forgotten. I thought I had a good knowledge of the way 1911s work before starting, but what I've learned since then led me to realize that I really didn't know that much at all, and makes me wonder what I don't know now that remains to be learned. I expected to get frustrated, and boy were those expectations ever fulfilled. The 1911 project has had its ups and downs, so I'm both happy and sad to bring it, and this account thereof, to a close.
Now it's time to build another.
Acknowledgements
There are a number of people who deserve thanks for their assistance with this project. Without the help of those listed below, building my own 1911 would have permanently stalled at several points, produced a much-inferior product, would never have even begun, or would never have even been thought possible.
First, I must thank my wife not only for being so supportive and encouraging of what is a ludicrously expensive hobby, but also for being a consistant anchor of sanity and clear-headed perspective. When I did something right, she graciously pretended to be impressed at my ability to take $200 and three weeks' time doing what's done in ten minutes by underpaid Brazilians in Imbel's factories; when I was frustrated and depressed by failure or lack of progress, my dark feelings were always tempered by the knowledge that though I might be the owner of a nonfunctional 1911 apparently made out of compressed money, at least my wife was a wonderful human being. I love you, sweetie!
Thanks are also richly deserved by Lazarus, whose assistance and knowledge has proven invaluable. His instruction in chamber reaming and trigger jobs demystified and made simple the two scariest and hardest parts of 1911 construction, and I continue to learn from his experience. Everyone should be so lucky to have a guide as knowledgeable and generous as he. Also, his love of 1911s and S&W revolvers mark him as a man of superb taste in handguns.
Without the incredibly informative posts of 1911Tuner, I probably would never have acquired any interest in what goes on inside firearms in the first place, let alone a desire to build one. Anyone can say, "do this to fix the problem" but few people have the ability or desire to explain why the problem is occurring or why the prescribed solution will work. 1911Tuner does, and his writeups on various functions of the 1911 are what made me realize that if you are willing to sit and think about it for a while, the 1911 will hold no secrets. His hospitable willingness to share information is one of the best demonstrations of the adage, "give a man a fish, and he's fed for a day; teach a man to fish, and he'll never go hungry." He deserves to be richly thanked for the help and information he's given so many, so patiently; I'm only one small example.
Thanks also go out to John Caradimas, who runs M1911.org. This site is the best single source of information on the 1911 on the internet, and its forums are the single most pleasant and civil discussion forums I've found on the internet, thanks in no small part to his dilegent and mature moderation.
There are also no small number of posters in the M1911.org gunsmithing forums whose helpful tips managed to get me back on track many times. All those who've ever offered a suggestion in response to one of my posts, or at least restrained the impulse to call me a dummy, deserve thanks as well.
Finally, I'd like to thank you for visiting my site and taking the time to read this writeup.
email: hidi.projects at gmail.com