A Million Little Pieces
I've Been Framed
Guts and Glory
Pins and Needle Files
My Luggy Day
Searious Issues
Sliding Into Position
All Together Now
Spacing Out
Wear to Go from Here
Barreling Ahead
Breech of the Piece
Starting Out with a Bang
Round Two (hundred)
The Kart of Barrel Fitting
Fed Up
Safety is a Snap
Dispatches from the Front
Pulling Through
The Final Part
Lessons Learned
Frequently Asked Questions
Errata and Clarifications
More articles
Sliding Into Position
At last it had arrived: The replacement slide I had been waiting for since A Million Little Pieces showed up on my doorstep. Wasting no time, I did what any red-blooded American would do: tried to put it on the frame. The slide-to-frame fit was initially so tight and rough that I thought filing the rails would be required. Fortunately, I applied prudence and oil before applying a file and managed to coax the slide at least as far as the ejecter, where it hung up. That made sense: Too high of an ejecter could always be filed down to fit the channel.
Yanking the slide off, I assembled its components. The barrel bushing and extracter, like the slide on the frame, were very rough and tight until coated liberally with oil, after which they slid into place much more easily.
The fully-assembled slide ran into more problems when placed on the frame. The bottom of the firing pin stop extended below the disconnecter rail. Whether it was incorrect specs on the part of the slide or a firing pin stop designed, like the ejecter, to be hand-fitted, the bottom of the firing pin stop caught on the rear of the frame nearest the hammer, which was slightly flanged. The flanging could probably be blamed on me for not lowering the hammer gently enough at some point while messing around with the frame assembly.
The solution to this problem was twofold, but both folds involved sanding and/or filing. I curtailed the radius of the firing pin stop as subtly as possible until it fit flush with the disconnecter rail. The flanging on the frame disappeared with a few gentle strokes of a file. I'm glad I was very trepeditious about filing the frame, as a more heavy-handed approach would have had me reshaping the frame instead of just bringing it back to its original shape.
The only hangup remaining on the slide-to-frame fit was the ejecter, so I filed it down until the slide slid over it without touching. After cold-bluing the filed areas of the firing pin stop and ejecter, I took a deep breath and moved on to the slide stop.
The problem with the slide stop was that it couldn't fit all the way into the slide. I had to remove material from the bottom before it would fully enter the slide stop port in the frame.

Not a stopping point.
Actually, I lied: There were two problems with the slide stop, but I didn't discover the second issue until the slide stop was able to fit in place: The top was too high to permit the slide to move. My files hadn't even grown cold, but I knew the drill: Fit, check. Fit, check. Fit, check. Repeat for about twenty minutes, or until the slide moves freely.
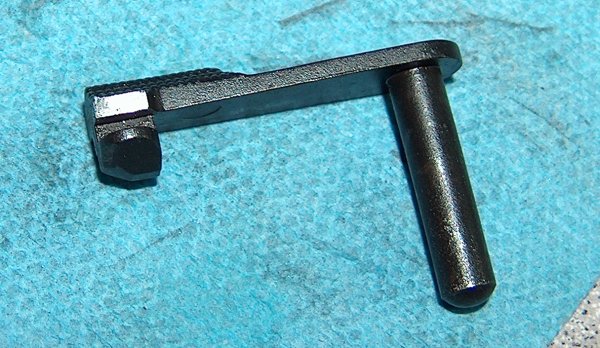
I topped my earlier fitting job.
In the process of filing down the top of the slidestop, I was able to make some observations. The top of the slide stop affects the way it functions, which is not too surprising, seeing as how it's the part that actually does the work of holding the slide open. Without a slight forward slope, the stop will catch the slide without a magazine in place. This is all fairly logical when you think about how the recesses in the slide move over the top of the stop, but my introduction to the concept came by way of trial and error. Business as usual, really.

The slide stop in action.
I cold-blued the exposed metal on the slide stop and was finally able to throw the gun together and test its complete function with snap caps. Hand-cycled ejection showed a tendency to eject horizontally, which indicated that the extracter tension might need adjustment. Hand-cycled rounds are not indicative of actual performance, though; I was just glad it extracted the snap caps at all.
Speaking of hand-cycling, working the slide by hand felt quite rough. I credited that to the bead-blasted mated surfaces working in. If more hand-cycling didn't fix things, there was always lapping compound.
In addition to the rough slide motion, the trigger was amazingly heavy and featured a definite two-stage creep. It functioned properly, so I decided not to worry about it for the time being.
I popped open a beer and relaxed. All of the above slide to frame fitting had been done over the course of a few hours, which translates to a fairly frenetic pace. (This is why this section doesn't feature many photos.) As fast as I had worked, though, it was now fairly late. Glamor photos of the assembled gun would have to wait until the following evening.
email: hidi.projects at gmail.com